IMPORTANT NOTES ON INSTALLING AND USING YOUR NEW PYLON
Note that this installation guide is only a guideline. Each boat is different and improvisation is needed to mount your Adjustable Ski Pylon on your boat.
We advise you to have your pylon mounted by a professional who has experience in Boat constructions and mounting other pylons.
INSTALLATION GUIDE
Step 1
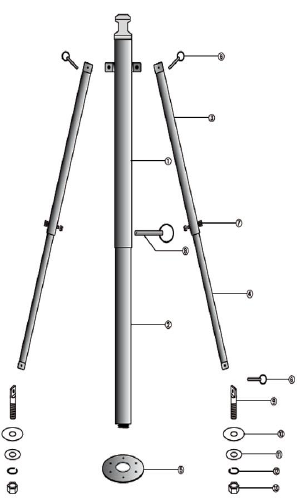
Assemble the pylon on the ground. You will not be drilling holes in the pylon at this point. Use the big clevis hitch pin to assemble part (1) and (2) of the main pylon.
Now screw the main pylon into the base plate (5) and set it to the desired height. Place the outer brace arms into the thru clevis on the pylon and pin with the 1/4” x 1” clevis hitch pins.
Step 2
Position the pylon to the rear of the boat at the boat?s center-line. Check that the telescoping arms reach the correct installation position.
NOTE- Necessary hardware for the next step not supplied.
Step 3
Install the pylon?s base plate to the bottom of the boat using 1/4-20 bolts and large surface area washers on the underside. If access to the underside is not possible to secure the bolts with nuts, use 5/16” lag screws and seal with silicone. The floor must be at least 3/4” (2cm) thick to use lag screws.
Step 4
Now insert each inner portion of the telescoping brace arms into an outer portion. Position them to the back of the boat at 45?-50? off the boat?s center-line from the main pylon (Figure 1). The total angle of left and right braces should be somewhere between 90?-100?.
NOTE- Braces that are too close together could cause the pylon to collapse.
Step 5
PRIOR TO DRILLING: Check to make sure that there aren?t any obstructions such as cables or wires. Mark your spots on the boat deck to drill holes for the deck clevises(9). Make sure both sides are symmetrical. Ensure marked area can be reached from below for the installation of the fl at washer (11), lock washer (12) and nut(13).
Step 6
Remove the braces from the deck and drill 5/8” holes through the marks you made in Step 5. Using clevis washers (10), insert the deck clevises (9) through the holes you just drilled.Now use the fl at washer (11), lock washer (12) and nut (13) to secure each clevis (tighten firmly).
NOTE- If the deck is not at least 1/2” thick at the mounting points, you must add a piece of marine plywood or similar Item to the underside of the deck to distribute the load / add strength.
Step 7
With the support braces attached to the pylon, connect the other ends to the appropriate deck clevis. One person apply slight forward pressure to the pylon while the other person uses the outer brace pilot holes to drill a 1/4” hole through each inner brace. Disconnect the braces from the boat. Bolt each brace through the drilled holes using 1/4” x 1¼” bolt and nylon nut (7). Reconnect the braces to the boat.
Care and Maintenance
I. Be sure to check and tighten all fasteners and connections prior to every use.
II. Always rinse rack after contact with salt (brackish) water.
III. Be cautious when towing or driving under obstacles, low hanging structures or trees.