Pay as you wish via PayPal or credit card.
Origin Wakeboard Towers > Installation Guide > Origin Wakeboard Rack Installation Guide
Origin Wakeboard Rack Installation Guide
IMPORTANT NOTES ON INSTALLING AND USING YOUR NEW RACK
Do not trailer your boat with wakeboards in the racks
Wakeboard ropes can catch on wakeboard racks and wakeboards during sharp turns causing damage to boards and racks. Be careful to prevent the rope from catching on the wakeboard rack and warn all drivers of this possibility
Do not stand on the wakeboard rack as it can bend the tube or forks and abuse is not covered under warranty
Failure to tighten the rack mounts can result in a lost fork assembly, and is not covered by warranty.
Test this by pulling on the rack each time before use.
Note that this installation guide is only a guideline. Each boat is different and improvisation is needed to mount your accessories on your boat.
INSTALLATION
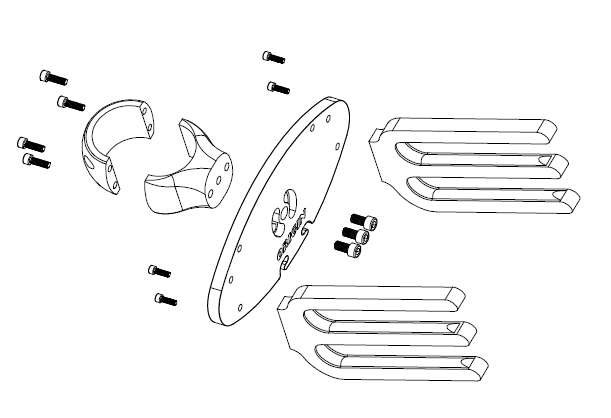
1. First assemble the two forks on the plate with 4x M6 screws, keep in mind that the forks should point up and make sure the logo is facing the outside of the forks and is not upside down.
2. Attach the plate on the back of the clamp with 3x M10 screws. Do not tighten the bolts, because you may have to swivel the rack after mounting it on the tower to get the rack horizontal.
Note: If you have a rack knob, please assemble the 2 side screws with the knob, but do not assemble the knob on the plate at this stage. If you prefer to use a standard wrench, please use wrench instead of the knob, the knob is supplied as a free tool for those who don't want to look around for a wrench when they release the rack or those who love the looking with a knob on the plate.
3. Remove 4x hex head cap screws from mounting clamp.
Split collar and place proper size of black collar inserts inside mounting clamp.
4. Select a suitable location for your rack. For the Origin tower, it is best to mount the rack about 2/3rd of the way up the rear legs. For other towers, mount racks on one of the vertical or close to vertical tubes.
5. Place mounting collar on tower and replace the 4x M6 hex head cap screws. Tighten screws to a torque setting of 22 ft/lbs. It is important to tighten the screws evenly or collar may bind, causing thread damage. A small gap between mounting collar halves will remain when tightened properly.
Notice: Improper bolt torque could lead to poor performance or product failure.
6. Note to keep a hold on the rack as up to this point the rack is not attached on the clamp and can fall off anytime.
Attach the plate assembly on the mounting collar which is mounted on the tower. Swivel the rack in a horizontal position.
Tighten screws. If you have a rack knob, tighten the 2 side screws with
the knob first, MAKE SURE THE CENTER HOLE OF THE PLATE IS IN ALIGNMEN WITH THE CENTER HOLE OF THE CLAMP.
Insert the big knob and make sure to tighten the knob so that the rack will not fall off during use.
Care and Maintenance
I. Be sure to check and tighten all fasteners and connections prior to every use.
II. You can maintain the new appearance of your board racks by wiping with a clean damp cloth after each use.
Soapy water, car wax or a commercially available marine water spot remover can be used as needed.
Avoid abrasive materials that might scratch the finish.
III. Always rinse rack after using on salt (brackish) water.